Sunday, May 28, 2023

 Hello...guess who's back.  Sorry it's been so long...seems folks are into Flosstube now instead of blogs. I just don't seem to find the time to post...too many hobbies I guess...stitching, designing, reading, quilting and gardening 😬

I've updated the pictures along the side with my designs from '22 & '23. Most should be available from your favorite retail outlet. Some of the older ones are no long being distributed but, with living close by, can be obtained at Cross Stitch & Crafts in Johnson City (423) 610-0441.

Keep on stitching!

Bonny  ~*

Saturday, June 5, 2021

OOPS! Correction to "I Live In The Garden"

 It was brought to my attention by a stitcher that there are a few errors on the alphabet (A, D, E & F) of "I Live In The Garden". Here is a picture of the correct stitch placement of this part of the chart. 


So sorry for the errors...I need a proofreader!!!!  
😬

Tuesday, May 4, 2021

I Really Do Live In The Garden

 Weather permitting...I am a gardenholic. From March to November I spend most of my daylight hours outside...digging in the dirt! Rainy days, I get some housework done and evenings, after dinner until bed, I stitch. It's a rainy day today so, here I am, avoiding housework!

My garden has expanded each year. I tried to grow some tomatoes and squash in the backyard several years ago with some success. We had a deer problem.

Expanded that and fenced it in...
Amended the soil...but still not getting the results I wanted. 

Then I found these fabulous raised beds. Starting with this large one in the corner of the front yard...yes I put it together myself...

I built it around our arbor with the bushes blocking it nicely from our road. Sun ALL day and everything planted in rich compost...

Okay...that worked well...just not enough room! So...
let's put another raised bed in and grow MORE...
still not enough space. So this year...
we rented a tiller and the hubs got started on the expansion. Well, as long as we had the tiller, why not expand even more. You know I'm going to want to next year...so go for it!
Guess what I'm going to be doing as soon as the rain stops....looks like Thursday. I've already planted some cool weather crops: broccoli, spinach, radishes (almost ready), carrots, peas, squash and beans. My tomato seedlings I started in the house are ready to plant as well as more direct sow seeds. I'm going to try corn and edible sunflower (seeds) this year in the expansion!

Fortunately or unfortunately (I do love them) our deer have moved on down the road. Someone has bought the 7 acres of woods behind us and are going to build two houses back there. Our herd of at least 15 deer have not been seen since they started clearing the land. So, I feel confident that they won't be a problem with the garden...now, the crows on the other hand...?

So how much longer before I plow up the entire front yard? What do you think? 
~*


Saturday, March 27, 2021

 Finishing Instructions: God Shed His Grace


I cut a sturdy piece of cardboard slightly larger than the stitched piece. I used a piece of batting sandwiched between the stitched piece and the carboard, wrapping the stitched piece around both and securing in the back with acid free Stitchery Tape. (If you prefer, you can lace your piece.)


Fold the corner in and bring the sides in to miter the corner.

Lay your stitched piece on some potential fabrics you may have or at a fabric shop to choose your finish fabrics.

I then covered two pieces of foam core with my chosen fabrics, again securing the fabric on the back with Stitchery Tape. I centered each piece and used E6000 glue to secure them. 
You may have a supply of trims that might work as well. I used a gold trim from Simplicity that I thought looked good with the America lettering. 
After gluing all three pieces together, I used a toothpick to apply glue to the joint of the stitched piece and red fabric covered piece and pressed the Simplicity gold trim around the edge of the stitched piece a little at a time. I started and finished at the bottom center.

I always love to see your finished pieces whether you finish them as I do or change them up as I so often do with other people's designs. You are welcome to share them here or on The Nebby Needle facebook page. Let your creativity flow!

Bonny  ~*


Thursday, March 18, 2021

Finishing Instructions for "A Stitcher's Wallet"

 
To finish your stitched piece into a usable "wallet" to hold your stitching supplies, trim your stitched piece with about 3/4" border around the stitched area.  You may want to stabilize your stitched piece by backing it with a fusible interfacing. Cut your interfacing slightly larger than the stitched area. This will help protect the stitching from coming apart with repeated use of the wallet and help it hold it's shape when stitching the lining to it.  

I lined my wallet with a coordinating piece of flannel fabric cut a foot longer than the stitched piece in order to fold a 3" deep pocket on each end. 
You may want to sew a decorative trim on each pocket before sewing your pieces together. I used a twill "ruler" ribbon I bought some time ago at JoAnn Fabrics (I see it's available online at Walmart now). On the other pocket I used a piece of cotton lace.

After stitching your trim on the pockets, fold them back as pockets and with right sides together, pin your stitched piece and lining together. Tuck your ribbons for tying into the center of each end securing the end of the ribbon centered on the outside edge with a pin.


Stitch your pieces together leaving an opening on one side to turn your piece right side out.
Before turning, clip your edges 1/4" inch from your seams and clip each corner.

Turn your piece right side out and use a chopstick or corner tool to gently square your corners. Blind stitch the side opening closed.

The thread rings I got in the jewelry section of JoAnn Fabrics. The silk ribbon I used for my closure was purchased from Shepherd's Bush in Ogden, UT.

Hand sew thread rings on the edge of one of the pockets. Gather your tools...counting pins, needles, needle threaders, frogging needles, scissors, etc. and store them within or on the outside of the pockets. The thread in your threaded needles will cling to the flannel and stay threaded! 

You can tuck your threads and thread rings into a pocket and your scissors into the other.


Fold and tie your wallet closed and slip into your project bag. 
Everything you need in one place!

ENJOY!

Saturday, March 13, 2021

 2021 Let's Go!

Since the 2021 Nashville Needlework Market was cancelled, Janis of Noteworthy Needle decided that a virtual Needlework Expo would do the trick! Wow...what a lot of work she put into it and what a success it was/is. Designers signed up and began creating their "booths" with their new designs, best sellers and sale items. We "manned" our booths with the ability to chat on camera with the shop buyers. Shops could browse the booths, chat live or message and place their orders in real time. Although the "virtual" part is over, the booths remain open to registered shops for message orders for the remainder of the month.

So...busy, busy, busy...printing, folding, bagging charts and filling orders. Several lengthy trips to the Post Office with boxes and envelopes! 

Here are my new designs that premiered at Needlework Expo:

A Stitcher's Wallet

Store your stitching tools and threads for your project in one place. Create two pockets: one to hold your scissors and one to tuck your threads into. Pre-thread several needles...the thread will cling to the flannel lining. I sewed a cotton "ruler" ribbon on one of the pockets and a decorative piece of lace trim on the other. General finishing instructions are on the pattern. More detailed finishing instructions along with pictures will be on this blog shortly.
                    
Tuck into the pockets what you need, fold over and tie shut with your ribbon and put in your project bag...everything in one place!
~

                                            God Shed His Grace
I finished this patriotic piece covering foam core boards with fabric. (Truth be told, I didn't have time before Needlework Expo to have it framed.) General finishing instructions are on the pattern. More detailed finishing instructions along with pictures will be on this blog shortly. I like the finish and think it sets the piece off better than a frame might have...so...happy I ran out of time! The little George Washington ornament I purchased during my last visit to Mt. Vernon. I've become a collector of George since finding out that I'm distantly related (my 7 times great grandmother was his grandmother's sister...cousin George!) 

                                                *Hope Blooms
Hope Blooms is this year's *Ripple Effect Pattern. These patterns sprang from an idea of Meg Ripple's. An avid stitcher, Meg asked if I would design cross stitch patterns of inspiration for her fellow cancer patients.  Although Meg lost her battle with cancer, I carry on her vision with a Ripple Effect Pattern each year.  The Nebby Needle's profits from these patterns are donated to the American Cancer Society each year in Meg's memory. As an almost 15 year breast cancer survivor myself, I chose to stitch the flowers in this design in pink.

                                                Into The Garden
Gardening is a very close second to stitching for me (as reflected heavily in this year's designs). I love being outdoors and digging in the dirt! I've put in several raised beds (tall ones) for growing veggies and am expanding the garden again this year to plant even more. Nothing like fresh from the garden veggies!!! There are flowers and herbs surrounding the raised beds as well...to deter the deer, rabbits and other critters...and to make it look pretty. It is, after all, in the sunny front yard. Our backyard is too shaded to grow much to eat.

                                            I Live In The Garden
Yes...from Spring until Fall I pretty much do...except for after dinner when I stitch until bedtime!

If you see anything here that you would like to stitch, contact your favorite shop and get your request in. If shops participated as a buyer at the Needlework Expo, they can order now. If your shop did not participate, they will have to wait until the beginning of April to order from the distributors.

Thanks for stopping by!
~*


Wow...It's been too long! Got busy gardening, designing and family issues and just got out of the habit of keeping this up. Other media outlets: Facebook & Instagram are quicker. Somehow the Pandemic sapped my motivation for so many things. Communication and socializing are probably the things I miss the most...so...let's get back to it! 

We just got in the 2020 Nashville Needlework Market in March last year right before everything got shut down. All went well and to my knowledge no one who attended got sick. In case you missed last year's designs:

                                                          Alphabet de Fleurs

This sweet alphabet was inspired by my Forget-Me-Not flowers that bloom in my garden in the spring. Anxiously awaiting their arrival this year!!!

Folly of Envy

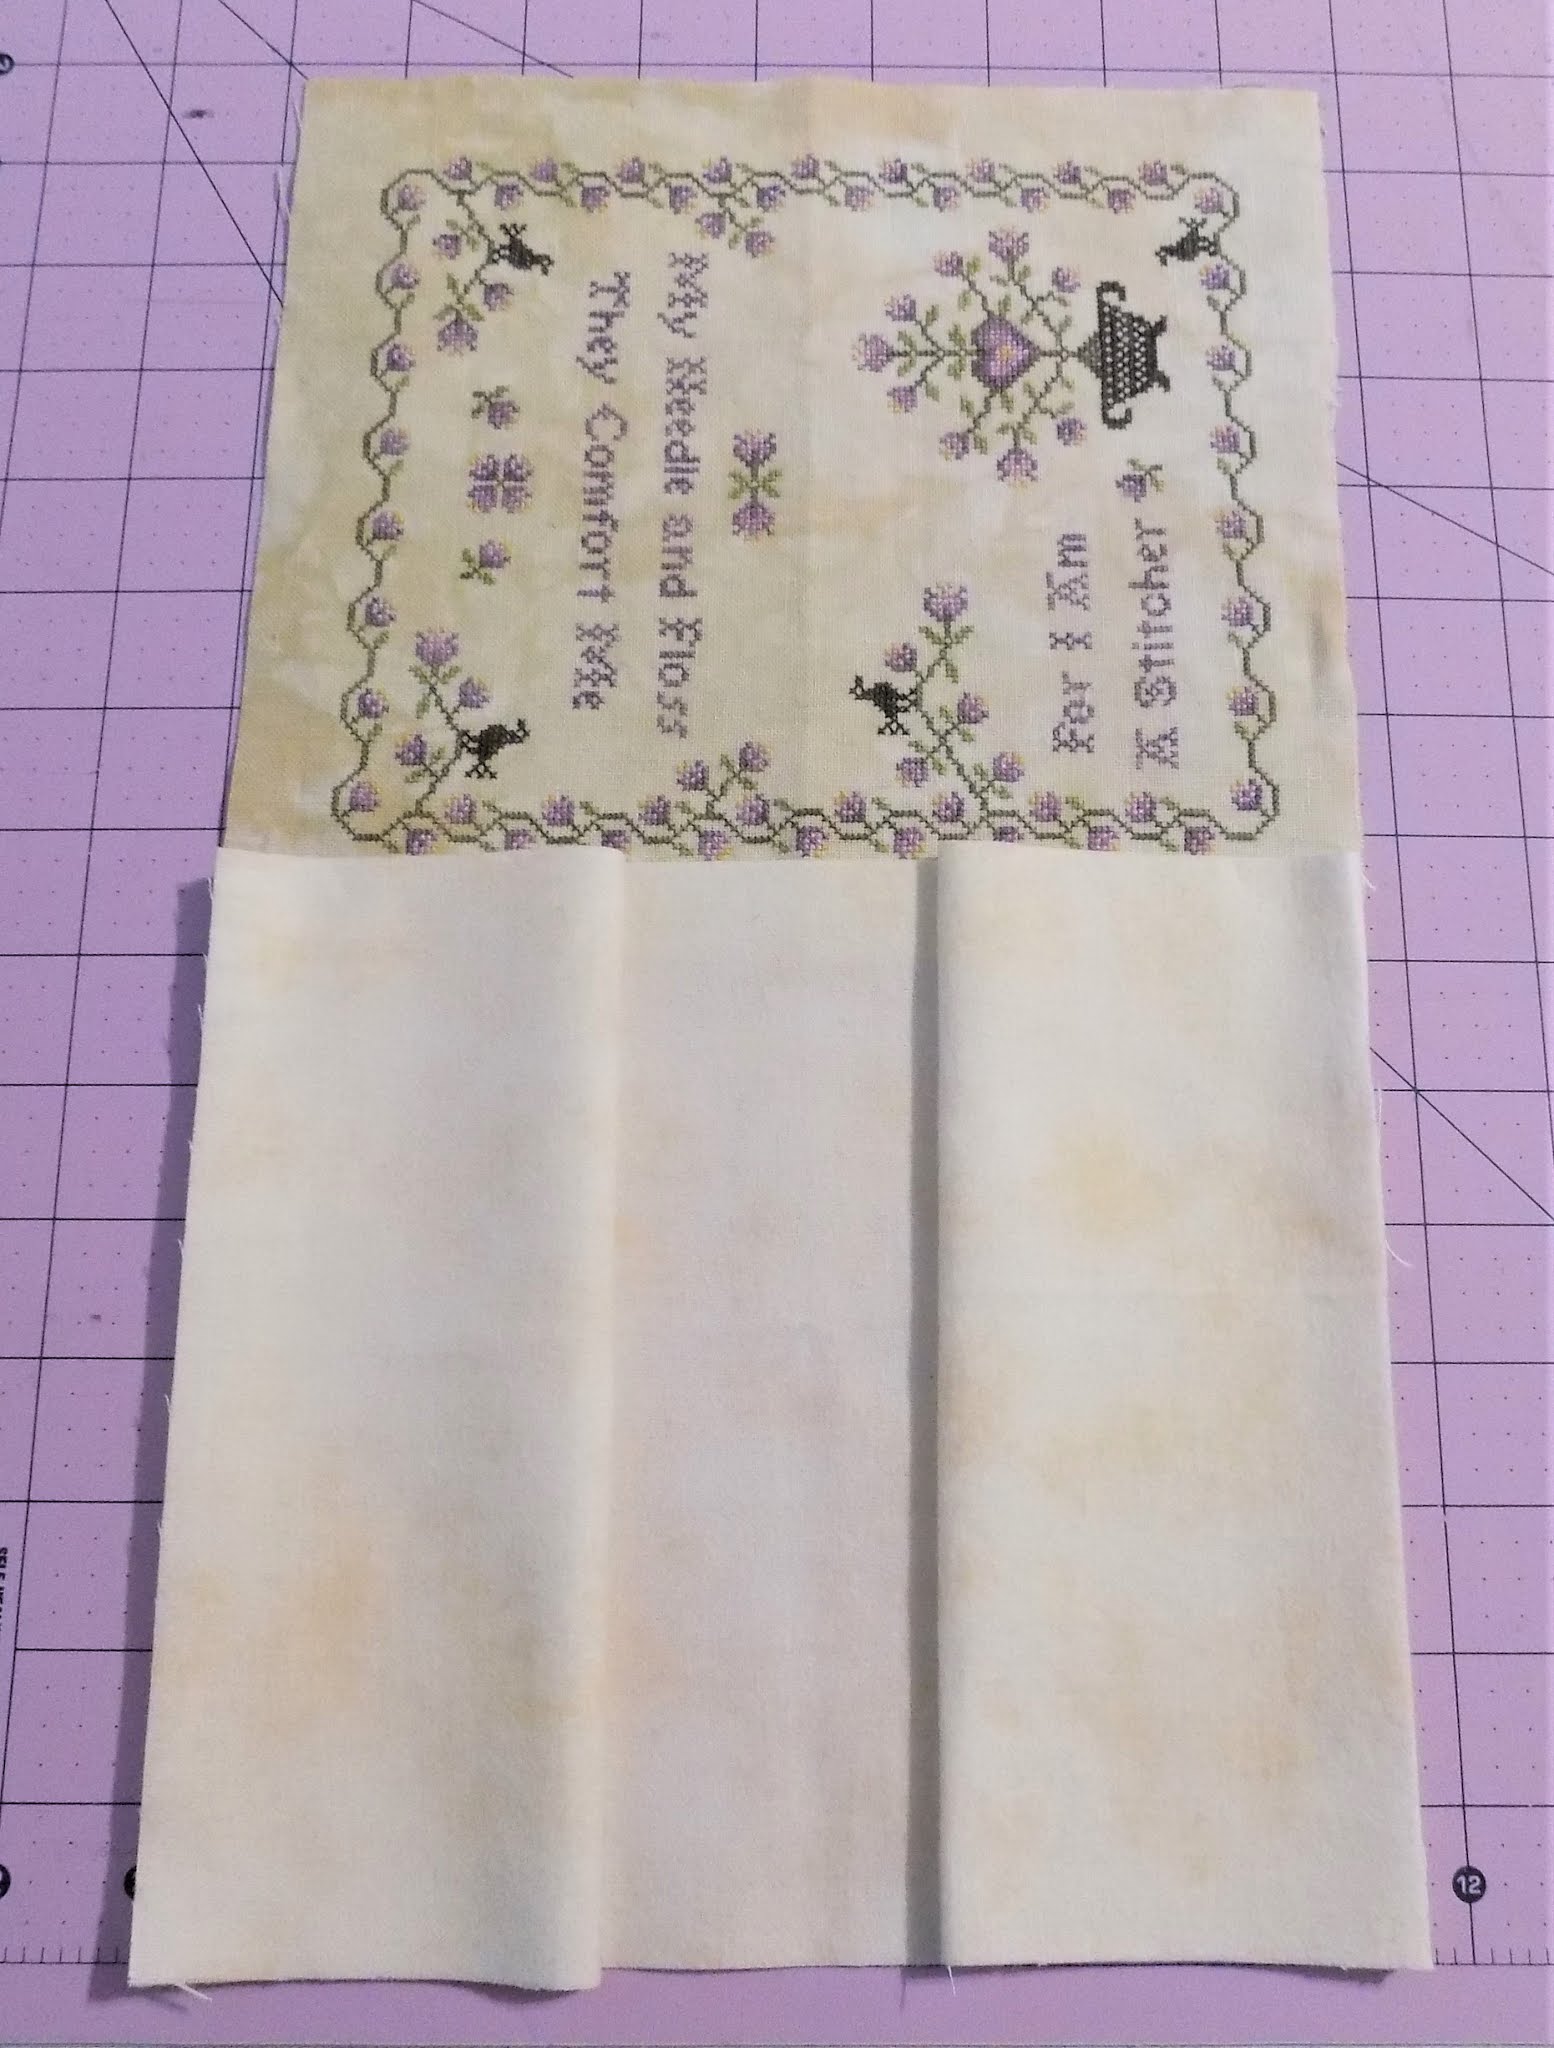
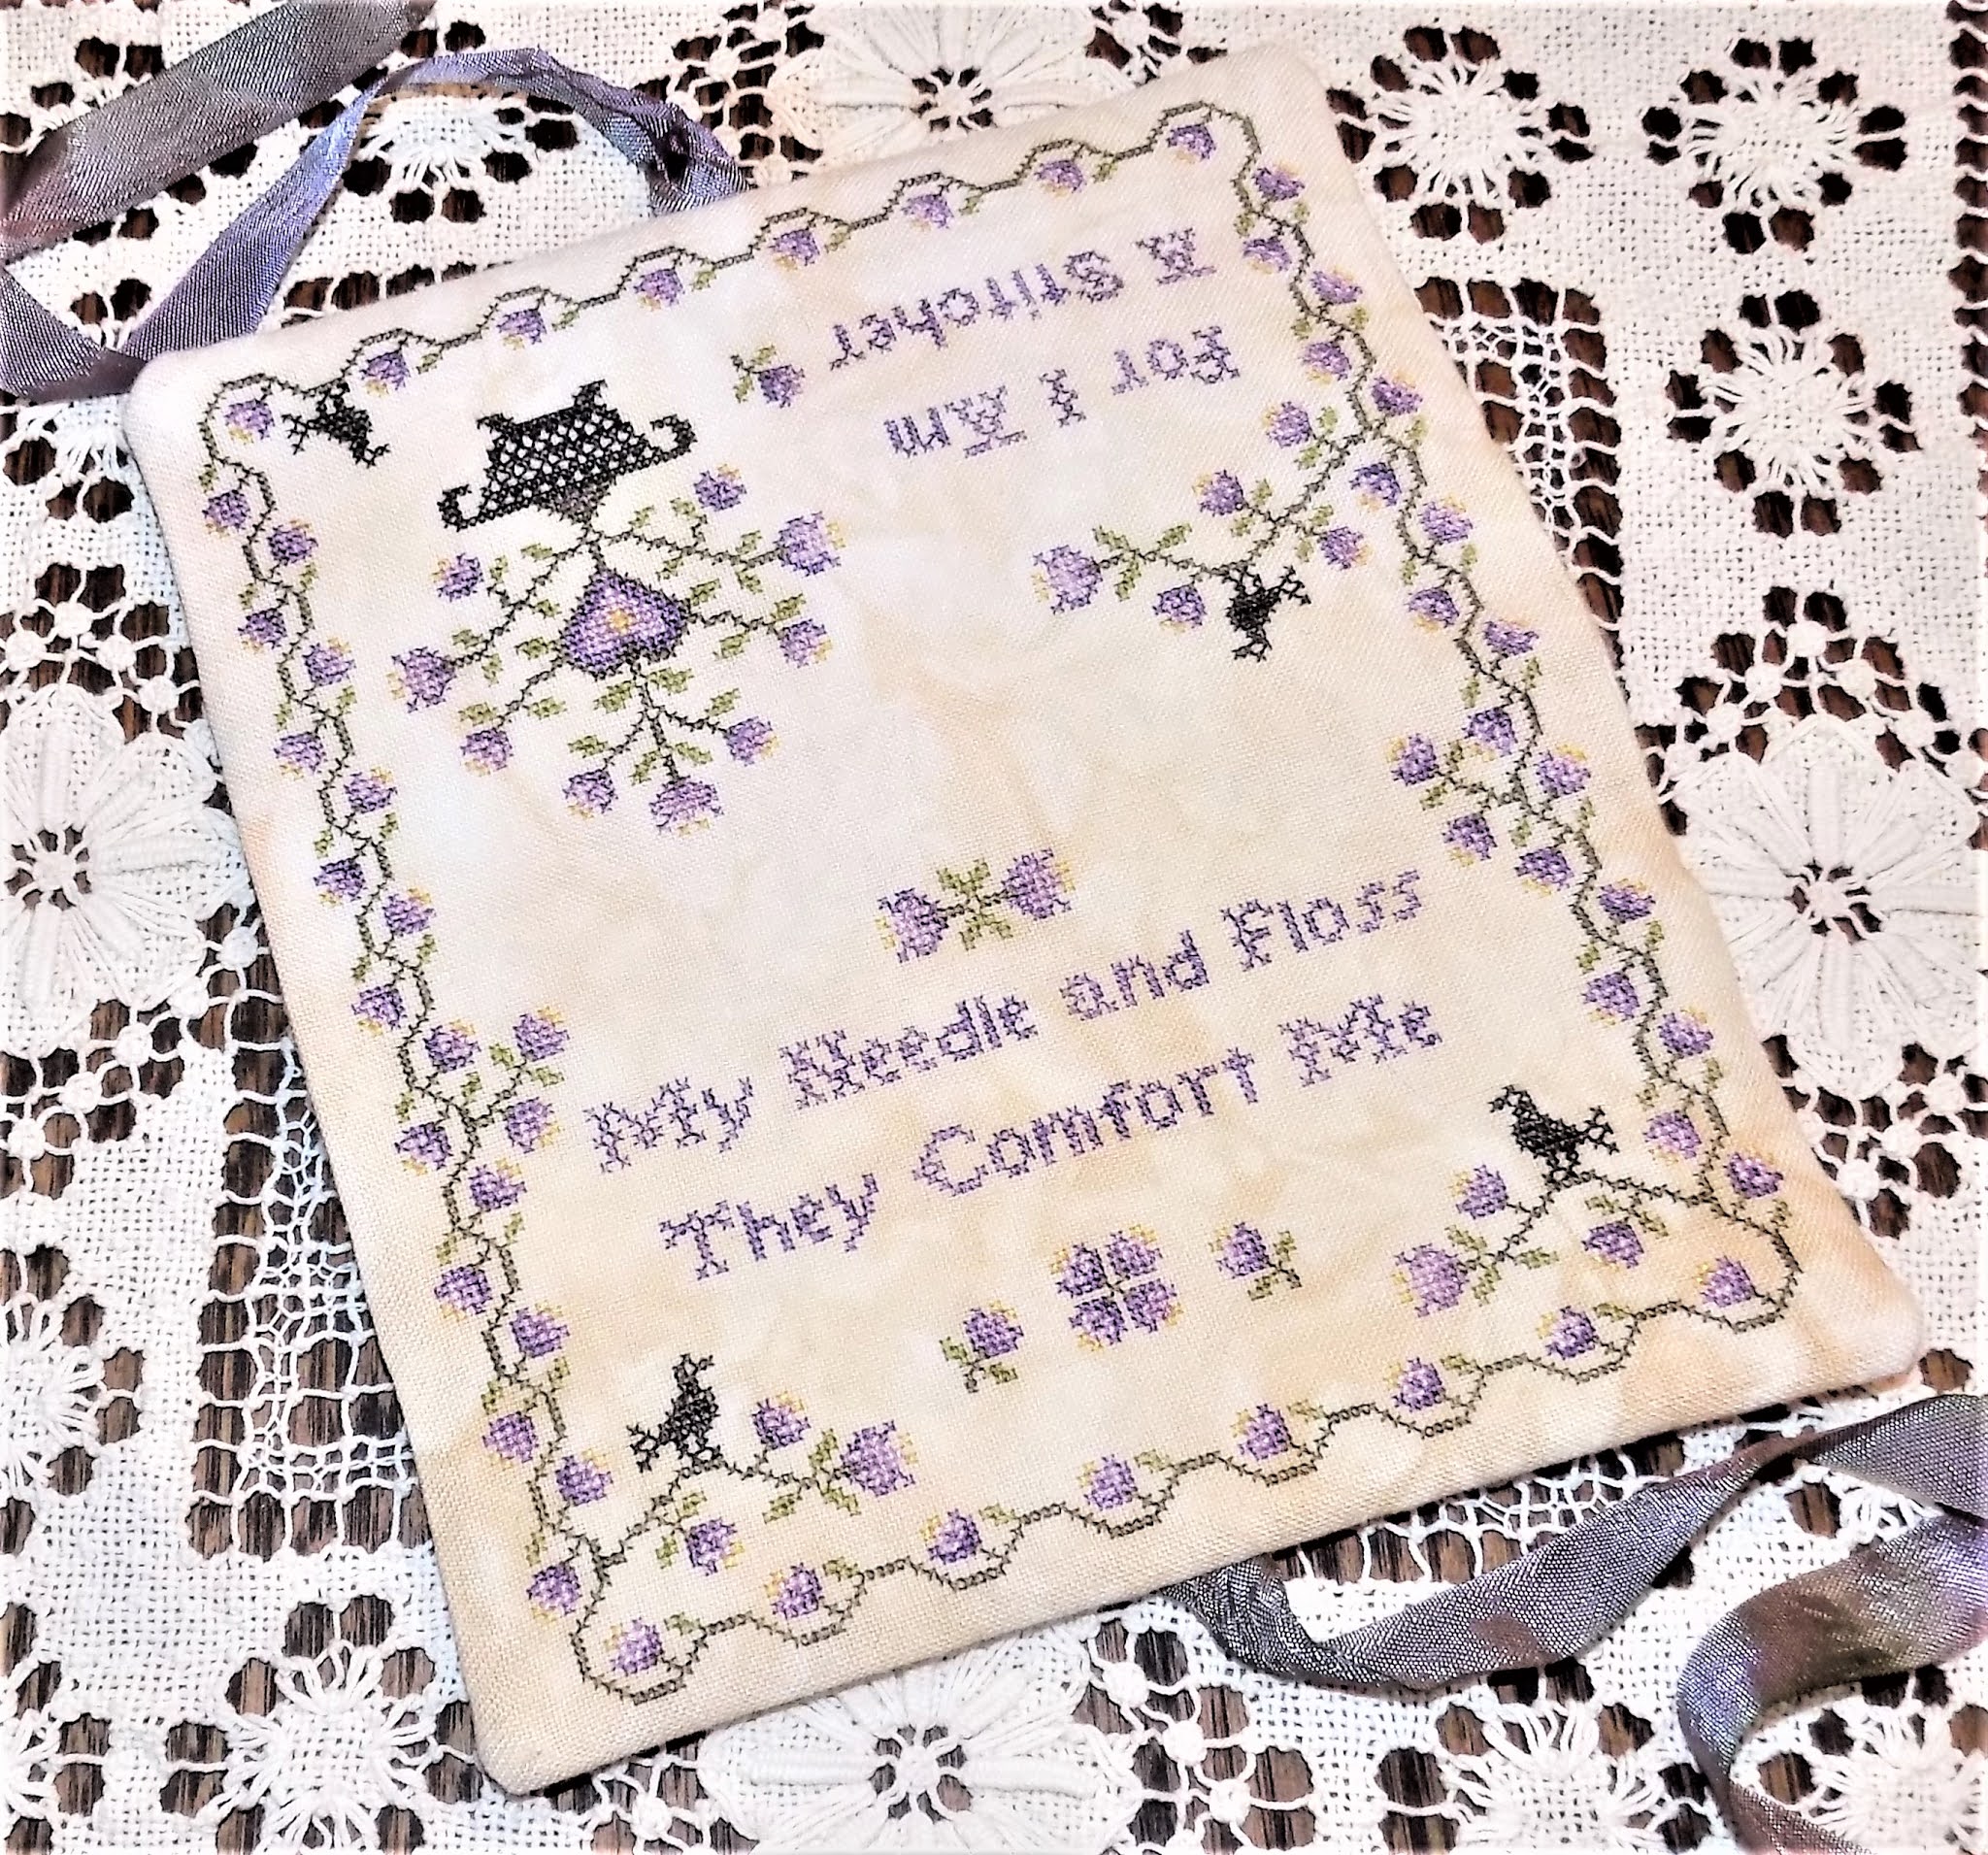
This is my interpretation of Margaret Matilda Baron's sampler stitched in 1834 at the age of 11.  She was my great-great-grandmother's sister-in-law. The original sampler is not in the best of shape and was just impossible to recreate the flowers...so I created my own. The verse is from The English Reader, published in 1813, and called Folly of Envy:

                                                                Folly of Envy
                                    Can you discern another's mind?
                                    Why is't you envy? Envy's blind.
                                    Tell envy, when she would annoy,
                                    That thousands want what you enjoy.

                                                        The Bees of Summer
This is a set of nesting boxes I purchased from Hobby Lobby and the cute picket fence from Walmart. What can I say...I'm a sucker for craft supplies. My love for gardening and the bees that pollinate the plants inspired these pieces. Complete finishing instructions are inclueded in the pattern.

                                                            Votes For Women

2020 marked the 100th Anniversary of the 19th Amendment giving women the right to vote. I felt it needed to be celebrated in a "stitchy" way as well as with my vote!

                                                                You Got This

This is the 2020 Ripple Effect Pattern. These patterns sprang from an idea of Meg Ripple's. An avid stitcher, Meg asked if I would design cross stitch patterns of inspiration for her fellow cancer patients.  Although Meg lost her battle with cancer, I carry on her vision each year with a pattern. My profits from these patterns are donated to the American Cancer Society in Meg's memory.

Later in the year I released two more patterns. First up:

                                                        2020 ~ Sew Over It

This sampler is fraught with many representations of the Pandemic Culture of 2020: the border represents the virus with masks in-between; the letters are 6 stitches apart; between the rows of letters there are directional arrows; the 5 star rating for 2020 is just half a star; Pandemic buzz words (covid 19, quarantine, homeschool, social distancing, work at home, was your hands, shelter in place, sanitize, mask up) are subtly stitched in "medical mask aqua" (Island Breeze); we endured the Pandemic "one stitch at a time" and are now "sew over it".  Even the thread colors are significant: "Island Breeze" not only medical mask aqua but, an island breeze we'd all like to be feeling; "Brick" the virus smashing the idea of an island breeze.

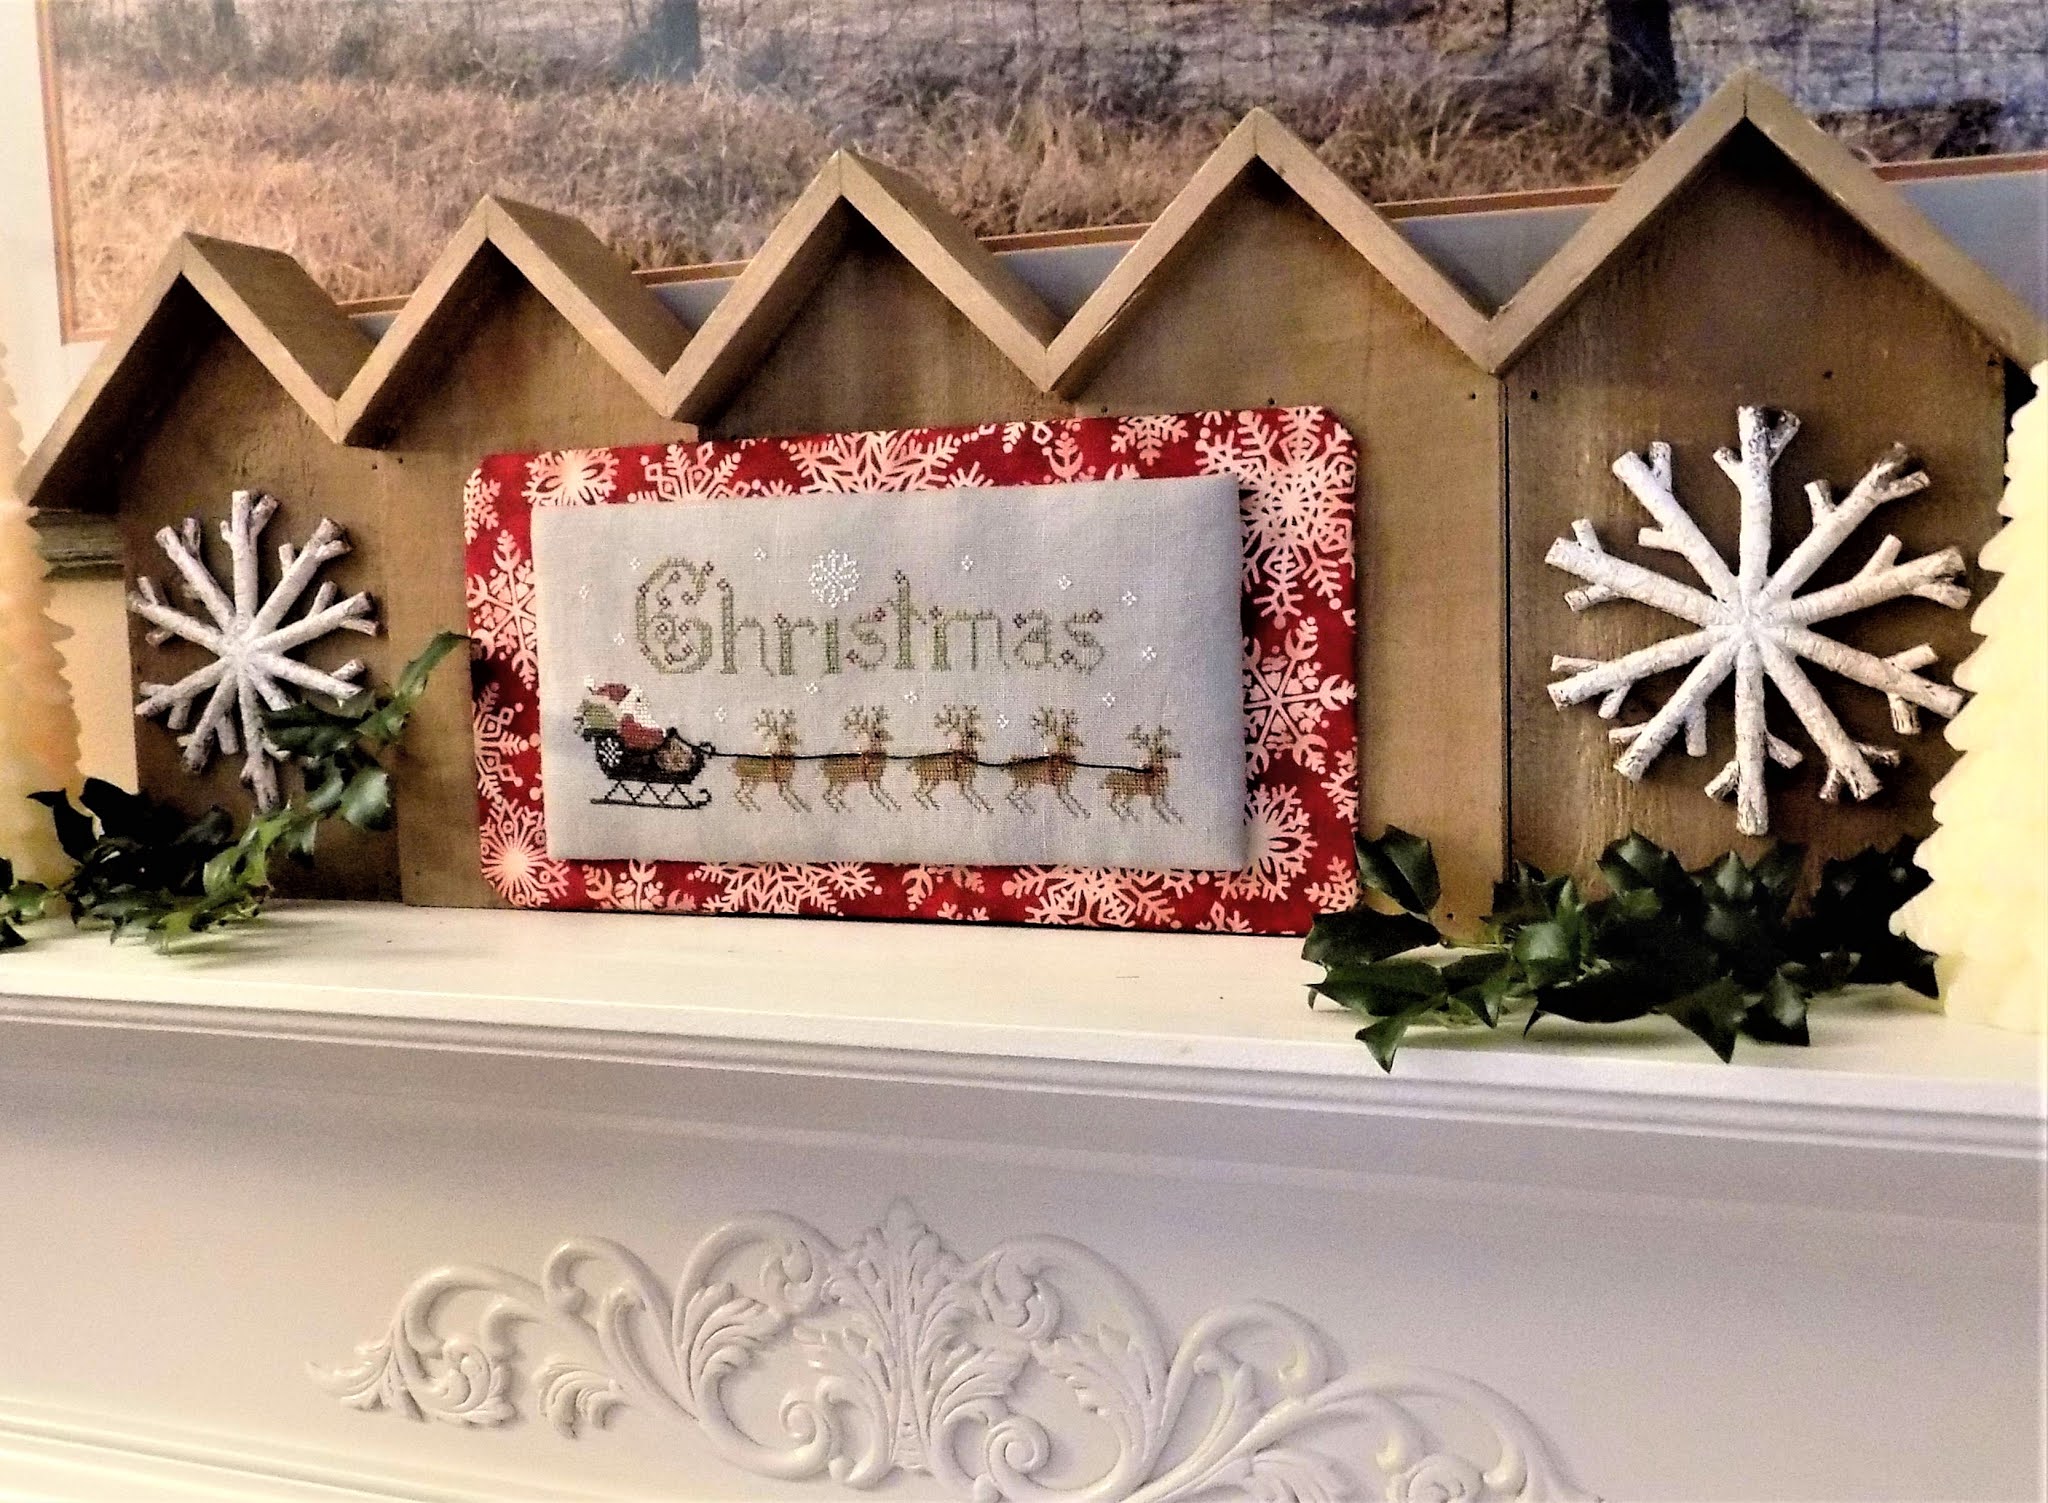
The last design released in 2020 was originally published in Punch Needle & Primitive Stitcher Magazine in the 2019 Christmas ~ Winter Issue.

                                                            Santa's Ride

Santa's Ride includes the finishing instruction as shown. The wood house wall hanging and snowflake ornaments were purchased from Hobby Lobby.

There you have my 2020 offerings!